 Loading...
 The Inspection Certificate 3.1 for test sieves with woven wire cloth is issued in a two-page version: Page 1 contains the actual inspection report with all required sieve properties and graphical representation while Page 2 shows all measured parameters to provide full transparency for the protocol on Page 1. All parameters are being acquired according to the measurement methods outlined in ISO 3310-1. An additional appendix showing screenshots of the inspection via Image Dimension Measurement Technology can be provided at the request of the customer.
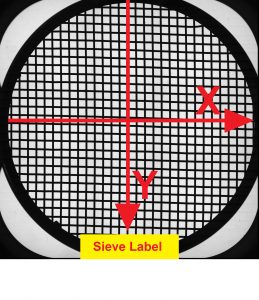
Assignment of Warp- and Weft-Directions: After completion of test sieve production, the directions of the original warp and weft from when the wire cloth was manufactured can no-longer be differentiated in a plain weave mesh. As a standardization measure and comparability of results of subsequent inspections, we take the sieve label as reference point and assign apertures running in Y-direction to Warp and apertures running in X-direction to Weft.
Nomenclature and Abbreviations used in Inspection Certificate:
±Y: Maximum permissible deviation of the arithmetical mean value of the aperture widths from the nominal aperture width (ref. Table 1, ISO 3310-1)
+X: Maximum permissible width of a single aperture (ref. Table 1, DIN ISO 3310-1)
σ0: Maximum permissible standard deviation (ref. Table 1, ISO 3310-1)
Arithmetic Mean Value w̅: Arithmetic mean of aperture widths measured in warp and weft direction
Deviation |±Y|: Deviation of the measured arithmetic mean values w̅ from the nominal sieve opening specified in ISO 3310 (this parameter must be smaller or equal to ≤ (±Y) for the sieve to remain norm-compliant)
Max w: The maximum aperture width measured in warp and weft direction (this parameter must be smaller than w+X (Nominal aperture width + Maximum permissible width of single aperture) for the sieve to remain norm-compliant)
Standard Deviation σs: The standard deviation calculated from the measured parameters shown on Page 2; calculated according to Equations 4 and 5 in ISO 3310-1 (σs must be smaller or equal to ≤ σ
K-Factor: The K-Factor for the given standard deviation. Calculated according to equation 6 ISO 3310-1 for Certification and equation 7 ISO 3310-1 for Calibration.
Arithmetic Mean Value d̅: Arithmetic mean of the wire diameters measured in warp and weft direction (must be within the permissible range for the wire diameter for the sieve to remain norm-compliant, ref. Table 1 ISO 3310)
Deviation Δd̅: Deviation of the mean value d̅ from the given nominal wire diameter for the respective sieve.
ni <(w-Y): Number of apertures smaller than w-Y (Nominal aperture width - Maximum permissible deviation of the arithmetical mean value)
(w-Y)<ni<(w+Y): Number of apertures with widths between w-Y and w+Y , this should be the largest fraction in a norm-compliant sieve
(w+Y)< ni<(w+X): Number of apertures wider than w+Y, but smaller than w+X (wider than desired, but still permissable until reaching a certain fraction)
ni>(w+X): Number of apertures that exceed the maximum permissible width of a single aperture (is this parameter greater than 0, the sieve is to be discarded)
 German Website