 Loading...

For Grain Sieves with perforated plates featuring slotted apertures, we issue Inspection Certificates 3.1 in accordance with the requirements outlined in EN ISO 5223. The inspection protocol includes all measured parameters, as required by the standard, and typically exceeds those requirements by including more apertures than are called for in ISO 5223.
For every grain sieve manufactured by Blau-Metall, we complete a certification inspection and save the inspection protocol in our records for at least one year. Customers can therefore request Inspection Certificates 3.1 for at least one year after receiving the product, without having to send the sieves back to us for measurements. Inspection according to Calibration guidelines, including at least three times the number of apertures required for certification, can be carried out at the request of the customer.
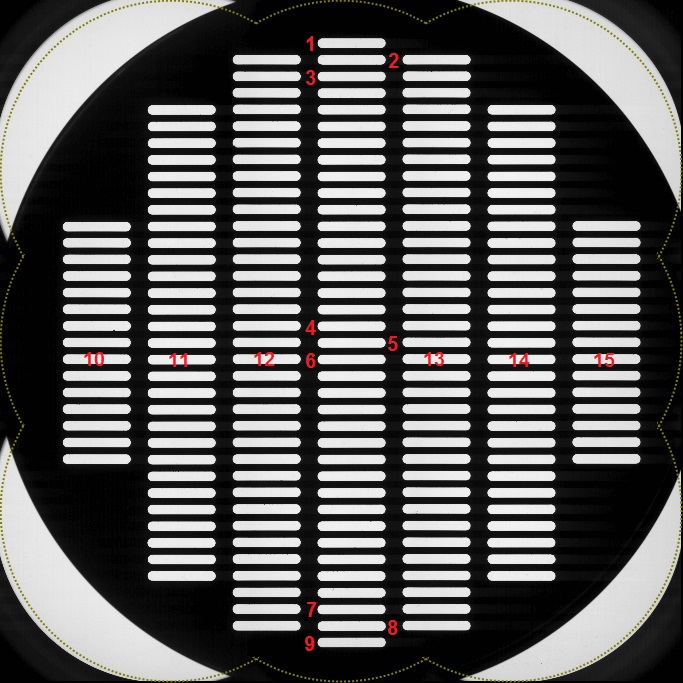
Assignment of aperture numbers: As required in EN ISO 5223, inspection is carried out along two perpendicular straight lines at least 10 centimeters in length. For Certification, nine apertures are measured in Y-direction and seven in X-direction; aperture pitch is measured in six instances along each line (required by ISO 5223 are measurements on five apertures per line). Assignment of aperture numbers occurs first along the –Y direction (Apertures 1-9), followed by the +X direction (Apertures 10-15); Aperture #5 is part of both lines. The reference point for –Y/+X is the test sieve label (facing downward in the image to the right).
Nomenclature & Translation of Inspection Certificate:
Width 1-15 (Weite 1-15): Width of every inspected slot aperture, Designation in ISO 5223: w1 (Desired Value (Sollwert) corresponds to the nominal aperture width, the upper- (Obergr.) and lower (Untergr.) limits correspond to the given tolerance on width ±Δw1)
Length 1-15 (Länge 1-15): Length of every inspected slot aperture, Deisgnation in ISO 5223: w2 (Desired Value (Sollwert) corresponds to the nominal aperture length, the upper- (Obergr.) and lower (Untergr.) limits correspond to the given tolerance on length ±Δw2)
Pitch 1-2 through Pitch 8-9 (Teilung 1-2 bis Teilung 8-9): Pitches along the Y-Line, Designation in ISO 5223: p1(Desired Value (Sollwert) corresponds to the nominal pitch, the upper- (Obergr.) and lower (Untergr.) limits correspond to the normal tolerances ±Δp1; Inspection according to the reduced Tolerances given in ISO 5223 can be perform when required by the customer)
Pitch 10-11 through Pitch 14-15, including Pitches 12-5 & 5-12 (Teilung 10-11 bis Teilung 14-15, einschließlich Teilung 12-5 & 5-13): Pitches along the X-Line, Designation in ISO 5223: p2(Desired Value (Sollwert) corresponds to the nominal pitch, the upper- (Obergr.) and lower (Untergr.) limits correspond to the normal tolerances ±Δp2)
The inspection of perforated plate sieves with round apertures (three denominations included in ISO 5223) is completed in accordance with the methods and tolerances specified in ISO 3310-2 which are identical with respect to tolerance and exceed the requirements of ISO 5223 for the number of apertures that are to be inspected.
 German Website